How to Upload a Photo to Collab Chat
Don't merely tell them. Evidence them.
The Ultra experience of Blackboard Collaborate makes information technology piece of cake to share your cognition. You tin can upload content, including PowerPoint® presentations, or share your desktop screen to testify more details.
Open the Collaborate panel and select Share Content to starting time sharing and collaborating with your attendees.
Not sure where the Collaborate panel is? Leap to Discover Your Way Around.
Yous tin upload multiple presentations in a session as long as the total file size is 125 MB or less.
Share application
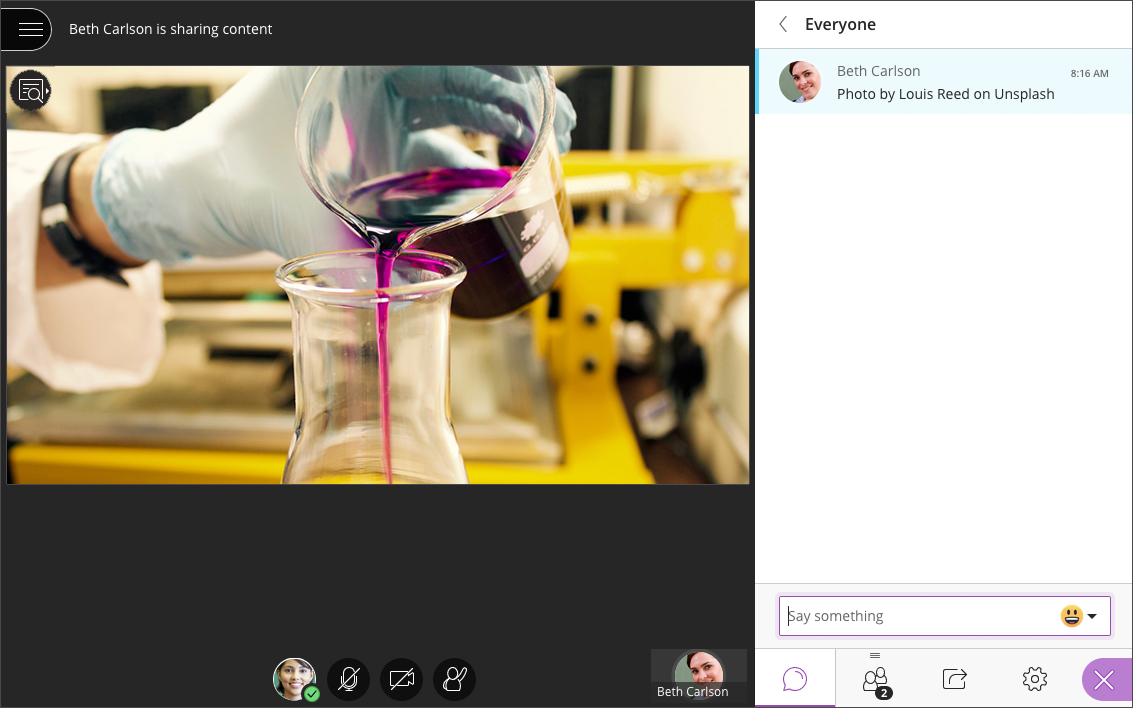
Share your desktop or a software application to teach students about a topic. Whenever you movement through the application or desktop, your students automatically follow along.
When you share your desktop or awarding it is seen by everybody in the live session and anybody viewing the recording later. Brand sure to close any windows and applications you don't want others to see earlier starting to share.
Don't miss any chat messages while presenting. See conversation alerts when in another application like PowerPoint. Select the Browser pop-up notification in your notification settings.
Awarding sharing is not currently supported on mobile devices or for screen readers in Blackboard Collaborate. If yous are using a mobile device or screen reader, you can share files and a blank whiteboard with your attendees. You tin't share an application.
Share audio and video streams and files
Utilize ChromeTM to share audio and video.
Share video from sites like YouTubeTM. Or, open up video and sound files you accept on your desktop in a new Chrome tab to share them.
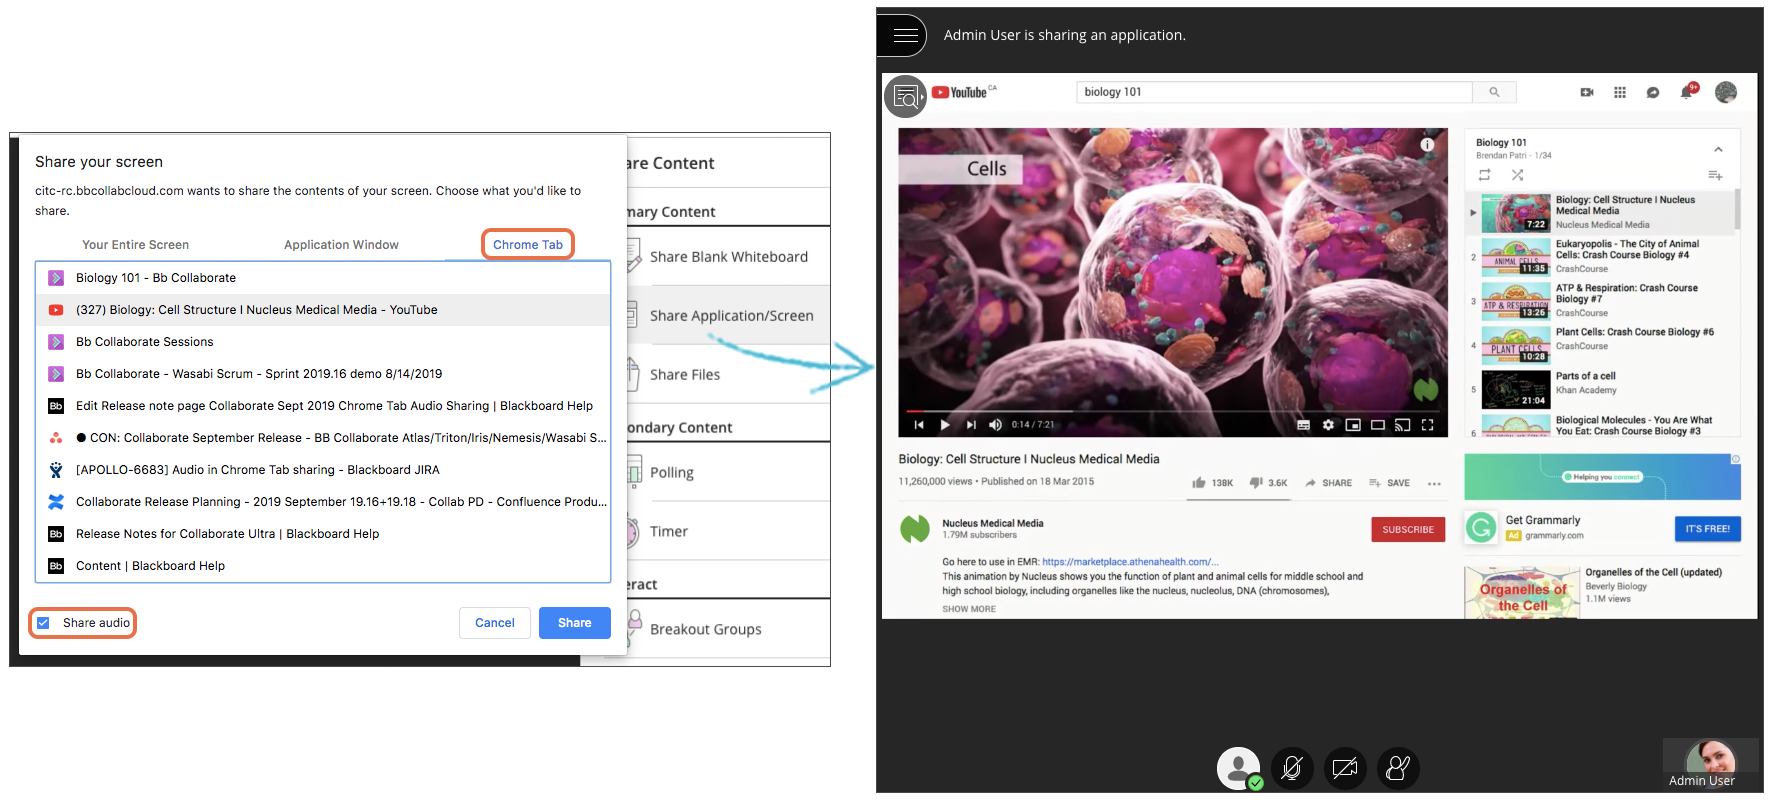
- From a Chrome browser, open the Collaborate panel and select the Share Content tab.
- Select Share Application/Screen.
- Select the Chrome Tab selection.
If yous are on Windows, you can also select Entire Screen.
- Select the Share audio check box.
- Choose the tab you want to share from the listing.
- Select Share.
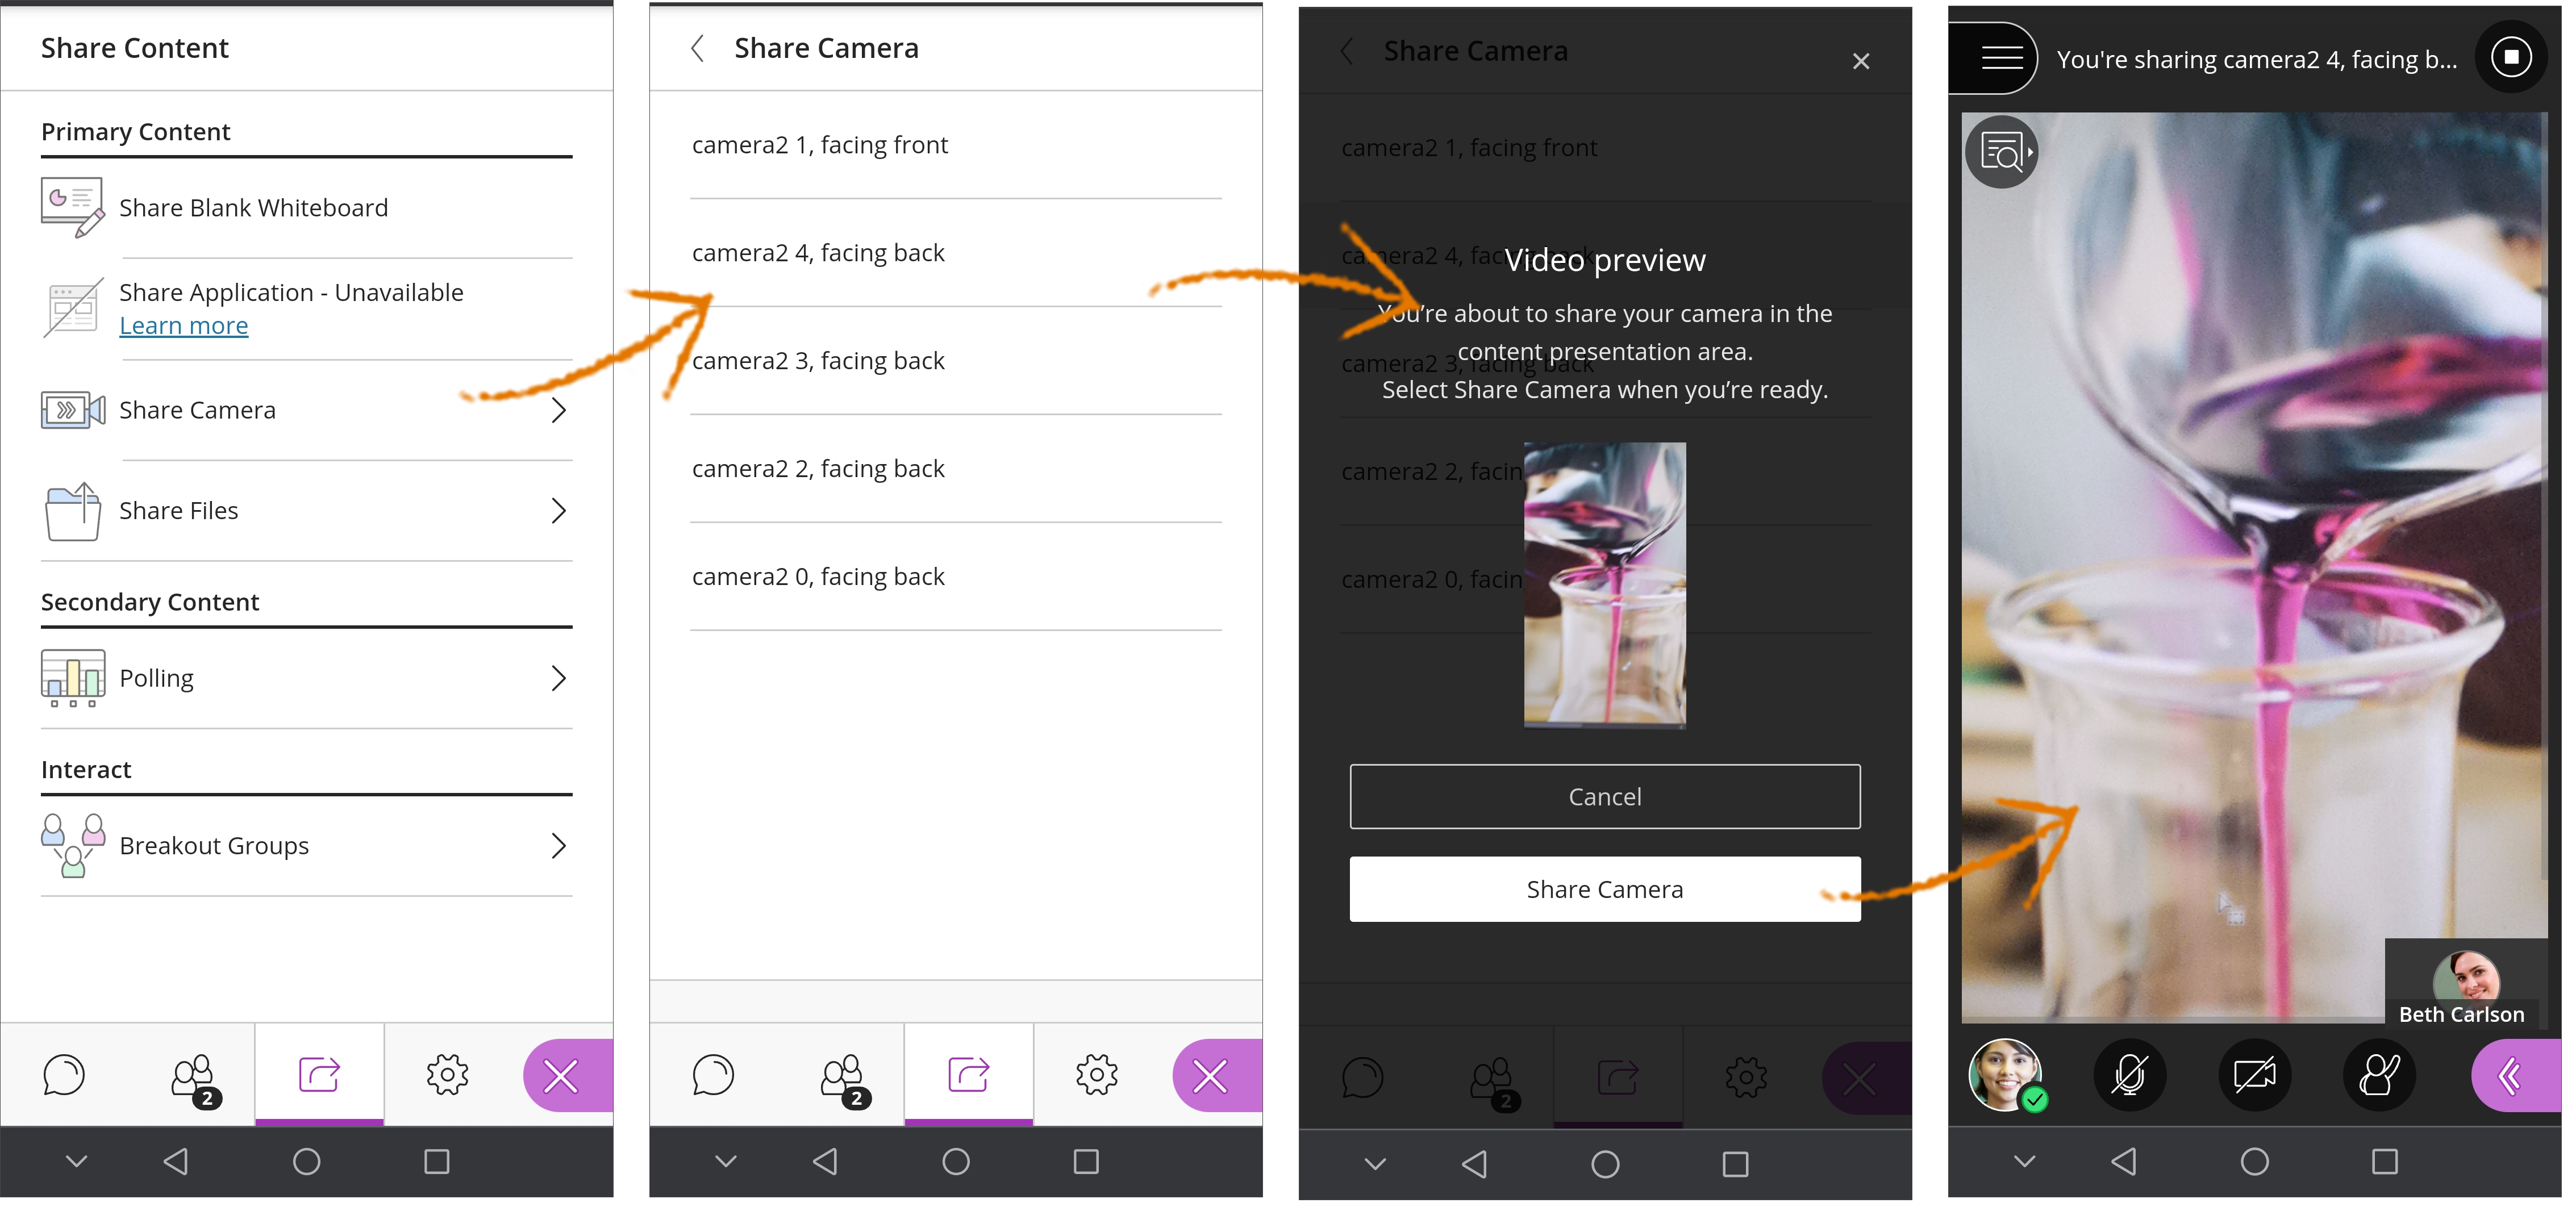
Share photographic camera
The Share camera option gives you the power to share more than than ane photographic camera. Share your video and share another camera connected to your figurer. Students can run into you and anything else you lot want to testify. You're simply limited by the number of cameras and USB ports in your figurer.
The video will appear backwards to you in the preview. This is normal. Your video will appear correctly to others in the session and in recordings. The video won't appear backwards to other attendees or in recordings. Video is merely mirrored in the preview window.
Photographic camera every bit content on mobile devices
Moderators can likewise share a camera on their mobile device as content on the screen. When attendees share their video using using the main tools along the bottom of the screen, their front facing photographic camera is used. This power to share the photographic camera as content on a mobile device means that moderators can at present choose to use their back or rear facing camera likewise.
But one camera tin be shared at a fourth dimension from a mobile device. Any video already shared will terminate to prove the video from the new camera.
Share files
Upload JPEG and PNG images, PDF files, or PowerPoint presentations of 60MB or lower to your session. You lot can upload multiple presentations, however the total size immune is 125 MB or lower for whatever detail session.
Limit PDFs and presentations to 500 pages or slides.
Screen reader users tin can access text from PowerPoint and PDF files shared in the session. This provides an like shooting fish in a barrel way to follow along every bit slides alter. Moderators and presenters must select Share Files and upload the files to Interact for screen readers to access the text.
Employ fonts common to both Windows and Mac devices for the best viewing experience. Other fonts may upshot in differences in spacing and line breaks for some users and in the recording. Use Helvetica, Arial, Courier, Georgia, Touch on, Open Sans, Tahoma, Times New rRoman, or Verdana for the best experience for everyone.
Select Add Files Here or elevate a file into the box to upload it. Select Share Now when yous're prepare for students to see the file.
You lot can prep for grade at the beginning of the calendar week, or fifty-fifty at the start of the semester! Join a session and load the files you desire to share. These files stay in the session until deleted by a moderator. Load them once and reuse them as often equally you lot desire.
Annotations and edits made on the files are cleared when the session occurrence closes.
If y'all can't join a session you want to upload files to, edit the session and modify the time to start now. Upload the files. Don't forget to change the start time back to the original time! Attendees won't come across the changes unless you lot send them another invitation.
You can cull to allow participants to marking up your shared file during a session in Session Settings. Open up the Interact panel and select My Settings. Go to Session Settings and make your selection.
If you are recording your session, allow 8 seconds for the recording to include your shared file before moving on.
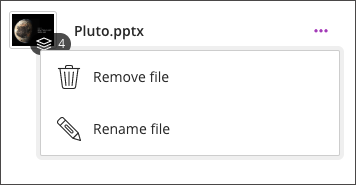
Remove and rename files
If you want to delete or rename a file, go to Share Files in the Interact panel. Find the file and open the File options bill of fare. Select the Remove file or Rename file.
What well-nigh PowerPoint slides?
Y'all can share PowerPoint files directly in Interact or share the PowerPoint application.
How do you know which to utilise? Allow u.s. assist y'all determine.
- Share files: For the all-time overall feel, use Share files.
- When uploaded each slide is optimized so all attendees tin can view quality slides no affair their network connectedness.
- With Share files yous tin can upload more one presentation at any time to have fix for your session.
- Uploaded files stay in the session until deleted past a moderator. This makes information technology easier to return to a slide if you demand to review.
- When you upload your presentation you lot tin use Collaborate editing tools with your slides.
- Yous can also choose to let participants to marking upwardly your shared slides during a session.
- Screen reader users can admission text from PowerPoint and PDF files shared in the session. This provides an easy way to follow along as slides change.
Moderators and presenters must select Share Files and upload the files to Collaborate for screen readers to admission the text.
More on sharing PowerPoint files
- Share application: Apply Share application, if you have animations in your presentation or if y'all are presenting live in a physical infinite and online at the same fourth dimension.
More on sharing the PowerPoint application
Share PowerPoint files

Select Share Files when using PowerPoint presentations of 60MB or lower. This gives you lot and your attendees the best feel.
Upload your PowerPoint and select Share Now. A slide navigator panel opens showing y'all all of your slides. Select a slide to start sharing information technology. Select the presentation name to open the slide navigator panel once more at whatever time.
If your presentation has animations, share the PowerPoint application instead of uploading the PowerPoint files.
Share the PowerPoint awarding
If you want, y'all can run your presentation in PowerPoint and share the application in Collaborate.
Make certain your presentation is prepare up and running on the screen you want to share before selecting Share application in Interact.
If you can, keep your Collaborate window visible and so you tin monitor conversation while presenting. Or enquire some other moderator to monitor chat for you lot.
For the all-time feel, don't use Normal or Total screen views for your presentations. These views can brand it challenging for you and your attendees to see everything. Instead, share your slides in a resizable window.
- In PowerPoint open the Slide Testify menu and select Set Show.
- Select Browsed by individual (window) and select Ok.
- Start your presentation.
- Resize the presentation window to the size you want. You're now set to share your slides in Collaborate.
- Select Share application and the PowerPoint application or screen yous want to share.
Watch a video about sharing PowerPoints in Interact
The following narrated video provides a visual and auditory representation of some of the information included on this folio. For a detailed description of what is portrayed in the video, open the video on YouTube, navigate to More actions, and select Open transcript.
Video: Sharing PowerPoint Files in Blackboard Collaborate with the Ultra feel explains the ii ways y'all tin can share your PowerPoint presentations.
Share whiteboard
Collaborate with your students using the whiteboard. Open up a blank whiteboard to depict or just jot down notes.
Utilize your device or computer screen capture tool to salve the whiteboard when you are done.

Y'all decide in Sessions Settings if participants tin can use the whiteboard and tools along with you during a session. Open the Collaborate console and select My Settings. Get to Session Settings and make your choice.
Annotation tools
Collaborate Annotation Tools
When files or a bare whiteboard are shared in a session, you tin use notation tools to edit and marking up the document during the live session. You'll find the annotation tools at the acme of the screen. These tools are available for both the moderator and participant roles unless the moderator turns it off in Session Settings.
Moderators tin share an annotated file in the main room with breakout groups. More on sharing files with breakout groups.

Document view settings
- Pan: Move the whiteboard or shared file on the folio.
- Zoom and Fit: Zoom in and out of the page or accommodate the view to fit the page or width.
Annotations
- Drawing, Brush, and Eraser: Describe freehand on the page with diverse colors, thickness, and opacity. Select the eraser to remove annotations. Y'all can erase parts of a freehand drawing with the eraser or select the Delete icon to delete the whole drawing.
- Text: Add text directly on the page. Yous can move, edit, and alter the text and select the font, size, alignment, and color of the text.
- Shapes: Choose Line, Arrow, Rectangle, Ellipse, Polygon, and Polyline. Each shape has its own settings to alter the colour, width, opacity, and more than.
- Articulate Annotations: Annotations are saved in the session. You can share something new, go to a new slide, or stop sharing. The annotations remain. Moderators tin can use Clear Annotations to delete all annotations from all pages.
- Highlighter: Select areas on a shared file to highlight. Every bit y'all highlight text on the page, an additional card opens. Y'all can highlight, strikethrough, underline, squiggle, or annotate on the highlighted section. The highlighter is only available on shared files. It's not bachelor on the whiteboard.
Upload a blank file of several pages to use a multi-page whiteboard.
- Arrow: Guide your attendees' attention to the chief points of your content. Select Pointer from the toolbar and start moving your cursor to what you want to highlight. All attendees will see your movements in existent time. To stop pointing, select thePointer button once more or any other tool.
Only moderators and presenters have a pointer.
- Clear annotations and Stop sharing: But moderators and presenters can clear annotations and stop sharing.
Source: https://help.blackboard.com/Collaborate/Ultra/Moderator/Moderate_Sessions/Share_Content
Post a Comment for "How to Upload a Photo to Collab Chat"